
Instant Shutters DirectSmart Size & Configuration Finder
Loading your Shutter Finder…
Getting the measurements and shutter options ready.
If this message stays on screen, refresh the page or email us for help.

Premium shutters. Ready when you are.

1Enter your measurements
2We check every option
3You only see suitable matches
READY-TO-GO RANGEREVEAL FITVIVID WHITE
Premium product • 75+ stocked sizes • DIY-friendlyOrder online and enjoy same-day pickup from Coomera for in-stock orders.
✓Premium quality, ready sooner
Solid PVC, aluminium reinforcement and 89mm louvres.
✓More than 75 stocked sizes
Vivid White with our DIY-friendly Small Z recess-fit frame.
✓Only see options that fit
Enter your measurements and we’ll check the complete Ready-to-Go range.
Need another colour, frame or size? Custom-made options are available.

Small Z Frame Explained

Our Small Z Frame fits inside your window reveal. Its 19mm lip sits neatly over the inner edge of the architrave, creating a clean picture-frame finish and helping cover small gaps around the opening.
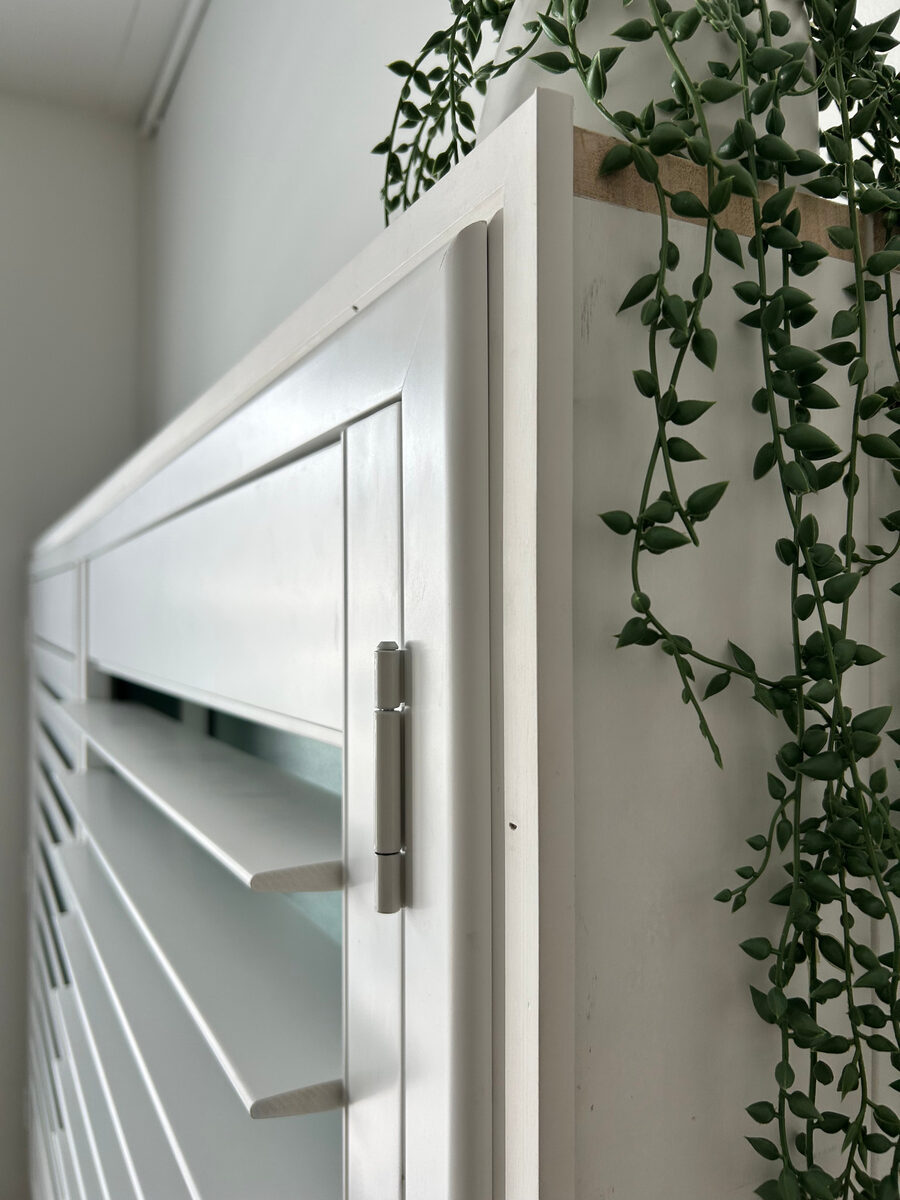
Close-up real-life example of a Small Z Frame plantation shutter sitting over an existing architrave Shutter panel Small Z Frame Existing architrave
Real-life example: The Small Z Frame sits inside the reveal, while the narrow outer lip finishes neatly over the inner edge of the existing architrave.

How the Small Z Frame fits

Bottom frame with the panel in place

Angled cutaway: the panel stile rests across the blue Z frame, flush with its outer edge and raised fixing section.

Shutter panel sitting on the bottom Small Z Frame A three-dimensional cutaway showing the solid shutter panel stile with hinges resting directly on top of the blue bottom Z frame. The panel spans from the curved outer edge to the enlarged raised fixing section. A screw passes through that raised section into the reveal, while the orange architrave continues downward behind the curved 19 millimetre lip. PANEL STILE HINGES FIXING SCREW 19mm CURVED LIP BOTTOMZ FRAME WINDOW GLASS WINDOW REVEAL / SILL EXISTING ARCHITRAVE

How the frame and panel are installed

Viewed from inside the room, in the order the parts are fitted.

A. Fix the empty frameArchitraveRevealFixing points go into the reveal behind B. Fit the shutter panelPanel sits inside the already-fixed frame
Z frameArchitraveFixingsHinges

Works with most common architrave profiles

The architrave begins behind the blue lip and runs downward—the Z frame remains proud of the profile.

Z sits proudFlat / square Z sits proudRounded edge Z sits proudStepped / decorative

Why it is well suited to DIY installation

A forgiving finishThe 19mm lip helps cover small gaps and inconsistencies around the window opening.
Easier to position and squareThe frame is fixed inside the reveal and can be carefully adjusted before the panels are fitted.
Less finishing workThe overlapping lip creates a neat perimeter without gap filling in most standard installations.

Want us to double-check your window?

If you are unsure about your reveal, architrave or an obstruction, send us your measurements and a few photos. We can check the application before you order.

The Finder will guide you through the required reveal-depth checks before showing your suitable options.

How to Measure Your Window

You’ll just need a tape measure. Take your measurements in millimetres and measure inside the window reveal.

Where to take your measurements

Take three widths and three heights inside the window opening.

Window opening measuring guide Two simple window drawings showing width measurements at the top, middle and bottom, and height measurements at the left, centre and right. WIDTH × 3 TOPMIDDLEBOTTOM Record all three widths HEIGHT × 3 LEFTCENTRERIGHT Record all three heights
Measure inside the reveal and record every measurement in millimetres. The reveal-depth check is explained separately in Step 3 below.
1

Measure the Width

Measure across the inside of the reveal at the top, middle and bottom.

Use the smallest measurement. Window openings are not always perfectly square, so the tightest point is the safest measurement to use.
2

Measure the Height

Measure from the sill to the top of the reveal at the left, centre and right.

Again, use the smallest measurement. Record the result in millimetres.
3

Check the Reveal Depth

Measure horizontally from the closest point of any obstruction to the front edge of the reveal at the architrave.

How much clear space do I need?

Ready-to-Go shutters require 55mm of clear reveal depth wherever the louvre blades open and close.

55MM REQUIREDObstruction behind moving bladesSide view of the window reveal ANY OBSTRUCTIONhandle · lock · key · winder 55mm clear space MOVING LOUVRE BLADES BACK / GLASSFRONT / ARCHITRAVE

The full 55mm prevents the moving louvre blades from touching the obstruction.

28MM MAY SUITObstruction aligned with a fixed railSide view at the bottom rail or midrail LOCK OR LARGE MULLION 28mm+ clear space FIXEDRAIL BACK / GLASSFRONT / ARCHITRAVE

A shutter may still suit when the obstruction lines up with a fixed rail. The frame normally needs 38mm; 28–37mm requires review of a possible build-out before ordering.

Why? The bottom rail and midrail are fixed, so an obstruction in these exact areas does not interfere with the moving blades. The frame normally needs 38mm. With 28–37mm, a build-out of up to 10mm may be possible, subject to our review before ordering. If any obstruction sits behind the moving blades, allow the full 55mm.

Not sure where your obstruction will sit? Use Send us a photo on the measurement or results screen so we can check it before you order.

4

Check for a Storm Bar / Midrail

If your window has a horizontal storm/support bar, measure from the bottom of the sill to the centre of that bar.

How to measure the midrail positionA window opening with a horizontal storm bar. A vertical arrow measures from the bottom sill to the centre of the storm bar. CENTRE OF BAR MIDRAIL HEIGHT MEASURE FROM THE BOTTOM SILL TO THE CENTRE OF THE BAR
If the window opening continues directly to the floor, take this measurement from the floor instead of a sill.
Midrail rule:
Up to 1500mm drop — not required.
Over 1500mm to 1750mm — optional.
Over 1750mm — required.
5

Common Mistakes to Avoid

Don’t measure the outside of the architrave — measure the inside reveal opening.
Don’t take only one width and one height measurement.
Don’t round measurements up or down.
Don’t forget to check handles, locks or winders that may reduce your usable depth.

Standard Range Reminder

Ready-to-Go Standard Range shutters are supplied in Vivid White with a Small Z Frame. The frame is recess fitted and has a 19mm lip that wraps around the face of the architrave.

Different frame types or colours require a custom-made shutter and custom pricing.
MeasureChooseReviewCheckout

Tell us about your window

Enter the measurements you recorded inside the window opening. We will use all three widths and heights to check that the shutter fits at every point.

Use a room or window name so you can recognise it in your order.

1. Measure the inside opening

Use millimetres. Enter your actual measurements without subtracting anything. Check each copied reading against your tape measure.

Middle and bottom will copy the top measurement automatically. Edit either field if your measurements vary.
Centre and right will copy the left measurement automatically. Edit either field if your measurements vary.

2. Check depth and obstructions

Measure horizontally from the closest handle, lock, winder, bar or glass to the front edge of the reveal at the architrave. Enter the exact measurement.
Not sure how to check the clear depth?
Measure from the closest part of any handle, lock, winder, bar or glass straight out to the front edge of the reveal where the shutter frame will sit. If you cannot confidently identify the closest point, send us a clear side-view photo and we can check it before you order.
Two different clearances: allow 55mm for moving blades. The frame normally needs 38mm. If an obstruction lines up with a fixed rail, 28–37mm may be possible with a build-out of up to 10mm; send photos for review before ordering.
DEPTH UNDER 55MM

Your measurement may still suit depending on where the closest obstruction sits. Choose the option that best matches your window. If you are unsure, choose I’m not sure and we’ll ask for photos before purchase.

Measure from the bottom sill—or the floor if the opening continues to the floor—to the centre of the obstruction or window storm bar.
ONE MORE FITTING CHECK
We ask this because your opening is over 1500mm high and may suit a shutter with a midrail.
Measure from the bottom sill—or from the floor if the opening continues directly to the floor—to the centre of the bar.
Optional: choose a specific window range or panel layout
Leave this on all ranges unless you already know which range you need.
Need help? We normally respond within one business day.
Checking all six measurements against our complete Ready-to-Go range…
MeasureChooseReviewCheckout
Need help? We normally respond within one business day.
OPENING SAVED

Your shutter option has been saved

My Shutter Project

Build your project one window at a time. Review your shutters and running total, then checkout together.

Want us to double-check your project?

Send your saved openings and a few clear photos to Instant Shutters Direct for a fitting review before ordering. We normally respond within one business day.

Photos that help us check
  • Full view of the entire window opening
  • Close-up of the reveal and architrave
  • Side view showing the available reveal depth
  • Handles, winders, locks or other obstructions

Send Window for Review

Send your measurements and clear photos to the Instant Shutters Direct team when you’re unsure about an obstruction, reveal depth, midrail position or shutter configuration. We normally respond within one business day.

Opening photos (optional)

You may send the enquiry without photos. If you would like to include them, add up to four clear photos with a combined size under 7.5MB.

By submitting this form, you agree that Instant Shutters Direct may use these details and photos to assess your opening and contact you about suitable products or custom pricing.

Request Custom Pricing

Your measurements and selected shutter have been carried across. Choose your preferred frame and colour, then send the details to Instant Shutters Direct for updated pricing.

Sizing Families

Fitting Rules

Standard tolerance
Width = nominal −2mm to +12mm
Drop = nominal −5mm to +2mm
Ready-to-Go ranges
The Standard Range, SP Range and A&L Window Range are all stocked Ready-to-Go options.
A&L Ready-to-Go fitting ranges
Uses the exact fitting range recorded against each A&L Ready-to-Go variant in Shopify Admin.
SP Ready-to-Go range
Nominal shutter width is 10mm wider than the equivalent Standard Ready-to-Go option; the same tolerance calculation is then applied.
Midrail
Up to 1500mm drop: not required.
Over 1500mm to 1750mm: optional.
Over 1750mm: required.
Maximum panel width
A panel must not exceed 900mm. Allowing for the SP frame sizing, the app permits up to 910mm for one-panel assemblies and 1810mm for two-panel assemblies. Wider shutters require four panels or another valid multi-panel layout.
Reveal depth and obstructions
Moving louvres require 55mm clear depth. The frame normally needs 38mm. With 28–37mm, an obstruction aligned with a fixed rail needs review of a possible build-out before ordering. Every midrail obstruction and every uncertain position is sent to Instant Shutters Direct for review before ordering.
Assisted Close panels
Panels over 750mm wide are referred to as Assisted Close. Because a larger, heavier panel places more strain on its hinges, lift the panel slightly and gently guide it into the closed position after it has been hinged open. This does not affect the appearance of the shutter—it only changes how the panel is closed.
5mm packing suggestion
The shutter make size is slightly smaller than its listed family width—approximately 3mm smaller. We suggest allowing around 3mm of wiggle room for ease of installation. When the tight opening width is 5mm or more over the listed family width, 5mm packing is suggested but not required. Example: an 1805mm opening matched to the 1800mm family receives the packing suggestion.
Visual shutter preview
Each suitable option now includes a simple mock shutter image showing panel count and whether a midrail is not needed, optional, or required.
Standard Range specification
All Standard Range shutters are Vivid White with a Small Z Frame. The frame is recess fitted into the reveal and has a 19mm lip that wraps around the face of the architrave.
Alternate colours / frames
Alternate frame types and colours require a custom-made shutter. Custom pricing differs from the Ready-to-Go Standard Range price shown.